News

Choosing from the seed stands or a seed catalogue at a garden centre is a bit like a kid in the candy store. So many colours! So many choices! What to choose?! Not only do you have far more choice in varieties but sowing from seed is the best value for money by a landslide. You can get anywhere from 4 seeds to 200 seeds in a packet for $4-5. Seed sowing takes more time and more effort but the results are worth it! If you are keen to try successional planting, seed sowing can easily help you plan out your harvest. After you have made the decision on what varieties to plant, here at the key points you need to know about growing from seed. Sowing in Soil: Some plants like carrots, parsnips, turnips, peas, and beans are best sown directly in the soil because they are root crops or don't like being disturbed. Ensure the soil is well-prepared, free-draining, and rich in compost for good seed germination. Create shallow channels for the seeds and fill them with seed raising mix to provide an ideal environment for germination. A rule of thumb is to plant the seeds at a depth of 2-3 times their thickness in the mix. Sow the seeds at the recommended spacing mentioned on the seed packet, cover them with soil, and gently firm the surface to ensure seed-to-soil contact. In colder regions or early in the season, you can use cloches to protect the seeds from bad weather conditions and cooler temperatures. Always label what you sowed and the date! Sowing in Containers (trays, punnets, or pots): Use a high-quality seed raising mix, which provides good drainage while holding enough moisture for seed germination. If reusing containers, make sure they are thoroughly cleaned to prevent the spread of soil fungal diseases. You can either sow multiple seeds in each cell and thin them later or sow several seeds in a larger container and transplant them once they have 2 true leaves. (True leaves are the second set of leaves that appear) Plant the seeds at a depth of 2-3 times their thickness. Label what they are and when they were sowed Keep the mix consistently damp but not overly wet until germination is complete, which typically takes 1-3 weeks for most species. Covering with some glass, a polythene cloche, or even newspaper can help maintain moisture and temperature. Place the containers in a warm, sunny spot during winter/early spring or in a shaded area during summer. After germination, remove covers and provide adequate ventilation. Keep the young seedlings moist and ensure they receive sufficient light. After 2-3 weeks, the young seedlings will be ready for transplanting into the garden. If you have germinated and grown the seedlings inside, it’s important to harden them off before exposing them to the elements overnight. Do this by sitting them outside in a sunny spot during the day and bring them inside at night for about a week before putting them outside overnight. This will help their outside layer to toughen up. Why aren’t my seeds germinating or what is wrong with them? Seeds not germinating or deformed seedlings can result from a number of things such as overly wet or dry conditions, extreme temperatures, wrong planting depth, soil issues, fungal diseases, pests like slugs and snails, and insufficient light. Make sure you read the back of the packet and follow the recommended planting guidelines and environmental conditions for each type of seed. Use fresh seeds. Open seed packets may have reduced germination rates, especially with certain plant varieties like lettuce, parsnips, celery, leeks, and onions. Following these guidelines will help you start your garden from seeds successfully and navigate any issues that may occur during the germination process. It's all about giving them the right conditions, a little TLC, and they'll be growing Shop our range of seeds, or quality products for seed raising & propagation. By Kelly Jean Reyland of Garden Advice NZ (www.gardenadvice.co.nz)

Are you interested in a natural, sustainable way to boost plant health and enhance soil fertility in your home garden? Introducing Effective Microbes, often referred to as “EM”. EM is a natural solution that works wonders in your soil, in turn bringing so many benefits to your plants. Learn all about the magic of effective microbes, and how they can benefit your entire garden ecosystem! What are Effective Microbes? In simple terms, effective microbes are beneficial microorganisms found naturally in the environment that can be applied as inoculants. These tiny creatures include bacteria, fungi and yeasts that work together in a harmonious symbiotic relationship; when introduced into your garden they can have a profound impact on plant growth and overall soil health. Beneficial bacteria, fungi & yeasts First off, we have the beneficial bacteria. These little powerhouses colonise the soil and assist in nutrient cycling, making essential minerals and nutrients more accessible to plants. They also suppress harmful pathogens, which protect your plants from disease. Next we have the beneficial fungi. These fungal microorganisms form mycorrhizal associations with the roots of plants. In a mutually beneficial relationship, the fungi provides plants with water and nutrients, while the plants offer the fungi a source of energy. This partnership significantly enhances the plant's ability to absorb nutrients and water, improving its overall resilience and health. Lastly, the beneficial yeasts play a crucial role in promoting the fermentation process. These yeasts contribute to breaking down organic matter in the soil, which releases nutrients and creates an ideal environment for plant roots to flourish. Beneficial yeasts are what you would use to ferment waste in a bokashi system as well! Four ways to introduce EM into your garden Now that you’ve been introduced to the three main players in EM, let's explore a few easy ways to harness the power of EM in your garden… 1. Compost Tea Compost tea is a nutrient-rich liquid brewed from compost and water, infused with effective microbes. It acts as a natural fertiliser and is a powerful tool to protect your plants from diseases. To make compost tea, all you need is some quality compost, water, and aeration to facilitate microbial growth. Apply it to your garden's soil or foliage regularly for best results. 2. Worm Wee or Worm Tea The liquid that comes out of your worm farm is packed full of effective microbes that will enhance soil structure, and boost nutrient availability. Just remember to dilute it before you water it into the garden. 3. Fermented Plant Extracts Fermented plant extracts are concoctions made by fermenting plant materials such as leaves, fruits, or herbs. Try soaking banana skins, or seaweed if you can collect some from the beach, in fresh water and some effective microbes. These extracts are rich in nutrients and organic compounds that encourage plant growth and stimulate natural defense mechanisms. 4. Mulching with Effective Microbes Adding effective microbes (like EMNZ, or your bokashi liquid) to your mulch layer accelerates the decomposition process. As the mulch breaks down faster, it enriches the soil with nutrients and organic matter, providing an ideal habitat for the beneficial microorganisms. 5. Applying a store bought EM mixture Using EM1 Garden Concentrate or EM Garden Boost (with fish hydrolysate) as a foliar spray, or when you water - is a simple way to boost beneficial biology and add macro nutrients and trace elements to your soil. EMNZ's certified organic microbial inoculants provide a broad spectrum of microorganisms, enzymes, vitamins, and various organic acids - all essential components for healthy soils and therefore plants. They will also support the growth of other important components in the garden, including mycorrhizae, earthworms, and insects already living in your soil! Reap the benefits of EM in your garden: Improved soil fertility: Effective microbes play a vital role in enriching the soil with essential nutrients, ensuring your plants receive the nourishment they need to flourish. Enhanced plant health: By promoting nutrient absorption and disease suppression, these beneficial microorganisms strengthen your plants' immune systems and resilience. Sustainable gardening: Using effective microbes reduces the need for synthetic fertilisers and chemical pesticides, leading to a more eco-friendly and sustainable garden. Harnessing the power of effective microbes is a simple but effective way to nurture your garden. Whip up some compost tea or homemade seaweed spray, and let these tiny superheroes work their magic in your garden. Your plants will thank you with a bounty of vibrant blooms, lush foliage, and a thriving ecosystem! Images used in this article show the difference between treated vs. untreated roots & grass when using EMNZ Effective Microbe products.

Dahlia flowers may have been considered old fashioned once upon a time, but these days many young gardeners are getting into bidding wars over these bold blooms. The blushy diva Cafe au Lait started the trend with brides-to-be, leaving florists and farmers flapping to keep up with demand. Now the everyday gardener is getting on board, and there seems to be no other flower that has captured our hearts quite like the dahlia has. Garden dahlias are unique in the flower world as they have the ability to come in such a range of colours and shapes. This is due to the fact that dahlias are octoploids, meaning they have eight sets of chromosomes, whereas most plants only have two. This great diversity has generated a collector's phenomenon among gardeners and a corresponding surge in tuber sales. If you're growing dahlias this year, you may be eager to try propagating them to increase your stock and save yourself some money. I promise it's not as hard or complicated as it seems; there are three main methods to propagate a dahlia, which I will demonstrate in this article. Propagation from division One of the easiest ways to propagate your dahlia is to divide the tubers. This requires you to dig up your dahlia tuber clumps in the winter, once the plant has gone dormant. Carefully lift your clump from the soil and leave it to dry before storing. In the spring, the tubers will naturally begin to 'wake up' with increased temperatures, and the eyes will begin to swell. At this time, you can begin to divide your tubers. To do this: Take your clump of tubers and use a sharp knife or secateurs to divide the clump. You may choose to cut the clump in half, quarters, or even individual tubers. Ensure each new clump of tubers or individual tuber has a section of the neck and crown intact. The neck connects the tubers together, while the crown is where the eye is located. A new shoot will grow from the eye, and if you are missing the neck or the crown from your division, it will not be viable. This is why dividing in the spring is the preferred option, as the eyes become more prominent and easier to see. Plant the tuber directly in the garden after the first frost or pre-sprout in potting mix. Propagation by Cutting The next way to propagate dahlias is by taking stem cuttings. Dahlias grown from cuttings will flower and form a new clump of tubers by the end of the season. Most competition show dahlias are propagated from stem cuttings, as it is much easier to control their growth when compared to a tuber propagated dahlia. The colour and vibrancy of the flower are said to be more intense when grown from cuttings. To do this: Take your clump of tubers or an individual tuber and lay them flat in a tray or pot. Cover with an aerated soil mix with added grit (pumice, sand or perlite). Dampen your soil mix but make sure it is not soaking wet. The tubers are prone to rotting and do not have the ability to use water until they grow roots and leaves. Place the tray indoors in a warm spot until the eye begins to sprout, this could take up to three weeks for some varieties. Check the moisture of the soil frequently. You can water lightly if it becomes too dry, but generally you will not need to water until the new shoot emerges. Once the shoot forms at least three sets of true leaves, you can take your cutting. Using a sharp pair of scissors, snip the stem at the base of the tuber. Remove the bottom set of leaves from your cutting, this is where the roots will grow. Dip in a rooting hormone if preferred, and place inside a pot using a cutting mix (potting soil with added grit). Water and place a clear bag over the top of the pot to keep up humidity and prevent the leaves from wilting. Leave in a warm area out of direct sunlight and keep moist. Your cutting should root in four to six weeks. During this time, it is important to be patient, I know it can feel tempting to pull the cutting out to see if roots have formed, but you could cause damage by doing this. Instead, check at the bottom of the pot to see if you can spot any roots. Once roots have formed, you can transplant the cutting to grow on before planting it in the garden. Propagation from seed Finally, there is propagation by seed. This has become an increasingly popular way to propagate dahlias thanks to flower farmer and breeder Erin Benzakein of Floret Farm, who has made information accessible and fun. Seed propagation will give you a brand new hybrid variety every time, and while some plants grown from seed may carry traits from the parent, this isn't a guarantee, and they can end up looking completely different. The added bonus of seed propagation is that it can be a cheaper option when compared to buying tubers. To do this: 1. Harvest dahlia seed heads in autumn once they turn brown and dry, or alternatively, purchase a packet of seed. 2. Sow directly on top of a good quality seed raising mix and sprinkle with a light layer of vermiculite, as dahlia seeds require light to germinate. 3. Place in a warm position indoors or on a heat mat until germination occurs, which should take 10–14 days. 4. Once germinated, carefully prick out seedlings into individual pots to grow on until established enough to be transferred into the garden in late spring. 5. Keep pots protected from frost as seedlings are tender. I hope you feel inspired to propagate your dahlias this spring. I'm sure you will be surprised by how little time and effort it takes to produce so many dahlia plants for you to enjoy in the garden. Happy propagating, friends! Thank you to Elly Keen @daydream.green for writing this blog for Gubba

Whether by necessity or for looks, container gardening has been around since people started living in cities. The container itself is really limited only by your imagination and drainage holes! You can choose from ceramic, metal, terracotta, plastic or even glass. The rule of thumb to follow for successful container gardening is choose the plant and get a suitable sized pot for it to grow into or choose a suitable sized plant to grow into the pot that you already have. Issues tend to occur when the pot is the right size for the plant right now but there is no room for the plant to grow. Small pots dry out very quickly and root bound plants (the roots have no space to grow so they grow round in circles, filling the pot) in small pots even more so. So please ensure that there is room for the plant to grow into the pot or be prepared to repot into the next size of pot each year or so. Some plants can even break the pot if they get too full of roots. There are plenty of options to plant in the pot – if you have a position in mind for your pots, select plants that thrive in those conditions. Is it full shade – part shade – full sun? Also choose plants that need similar living conditions and water requirements so they can live happily together in the same pot. Do you want the planting to be permanent or is this a container that you want to change each season? If it is permanent – do you want it to be evergreen or deciduous (sheds its leaves in autumn)? Evergreen plants will shed a few leaves regularly but will look the same year-round. Deciduous plants shed all their leaves over the space of a week or so but there is generally the bonus of seasonal interest in the way of foliage changing colour in autumn and potentially spring blossom. A word on potting mix. You get what you pay for. If you are planting trees or shrubs that are going to be in the pots for years, I highly recommend that you invest in a premium potting mix. They have all the additions such as wetting crystals and coir fibre that help a plant thrive long term. The slow-release fertiliser will run out, generally in 9 months to 1 year. After that you are responsible for feeding your plants. If you are planting containers that will be changed every season, you have the opportunity to refresh and add new potting mix. In this situation you can use a middle range potting mix where the fertiliser won’t last as long. The cheapest bags will have little to no slow-release fertiliser and no extras. If your potted plants aren’t thriving it could be they are planted into cheap potting mix. Compost or garden soil shouldn’t be used in pots in place of potting mix. Compost is too rich and is still breaking down so it can get quite warm in the process and shrinks down quite a lot. Soil is full of living organisms that need access to the other living organisms around them so when we contain them in a pot and cut off access, they die off and the soil structure becomes very compacted. Feeding and watering your potted plants is vital if you want a good display and healthy plants. As mentioned in the word about potting mix, the slow-release fertiliser will only last for so long, anywhere from 3 months to 1 year. After that time, there are nutrients in the mix to feed the plant. So ensure that you put a reminder on your calendar to top up slow-release fertiliser and during the warmer months, top up with a liquid fertiliser to give them a boost. Liquid seaweed and kelp pellets are a great health tonic, but they don’t replace fertiliser. Granular fertiliser from Tui or Yates are too strong for use in pots and will state on the packet if they are not recommended for use in pots. If you have dogs, avoid using blood and bone or dried blood in your pots as you may come home to find the plants pulled out of the pot and potting mix everywhere. Watering is particularly important in pots as the roots are contained and can’t go searching deeper for water. Pots are generally free draining unless the pot has a saucer under it. With a saucer in place, they can stay quite damp so consider what you are planting into them. When planting larger shrubs or trees, you can mix up to one quarter of compost into the potting mix as this will help retain more water. This will help prevent stress during the warmer months. It’s not uncommon to need to water larger potted plants twice in the hottest summer months. Potted plants don’t tend to need much watering over the cooler months as they don’t physically require as much water and rain will generally provide ample moisture. Keep an eye on the pots though as you can get areas that are sheltered from rainfall by buildings or other plants, and these will need hand watered when necessary. Make sure you turn off any automated irrigation systems. As with any potted plants, the general rule of thumb is to water deeply, less often rather than a light sprinkle every day. Plants should be allowed to dry out (just not completely!) before watering again. It’s best to water in the morning and if possible, only water the soil rather than over the foliage to help prevent fungal disease. If you have drippers or sprinklers set up in your pots, it’s best if these are used in the morning so the plant has the moisture available during the heat of the day. But again, you need to keep an eye on your pots – especially if it is on an electronic timer- because it will water them on schedule regardless of whether they need it or not. After your pots have been planted for several months, it pays to take notice if the water you apply is running straight out the bottom of the pot. Or after you finish watering, when you scratch below the surface of the potting mix, it is still dry. Potting mix can become hydrophobic where it repels water. It also happens to soil in garden areas where it doesn’t get rainfall such as under house eaves. In this situation you need to apply a soil ‘re-wetter’ that will remedy the issue and get the mix absorbing water again. Saturaid and Yates ‘Concentrated soil wetter’ will both sort this issue out. Container gardening is hugely rewarding, particularly when you don’t have a lot of garden space or a big section. Many plants can be grown very successfully in a container. The key to beautiful thriving pots is to put some thought into what you’re going to plant beforehand, get the right stuff for planting them and keep a regular eye on them once they’re planted! You can enjoy a garden wherever you live, and you can take it with you if you leave. That’s a big bonus! By Kelly Jean Reyland of Garden Advice NZ (www.gardenadvice.co.nz) Images:"Container garden" by Richard Masoner / Cyclelicious is licensed under CC BY-SA 2.0."container garden on the patio" by thomas pix is licensed under CC BY 2.0.

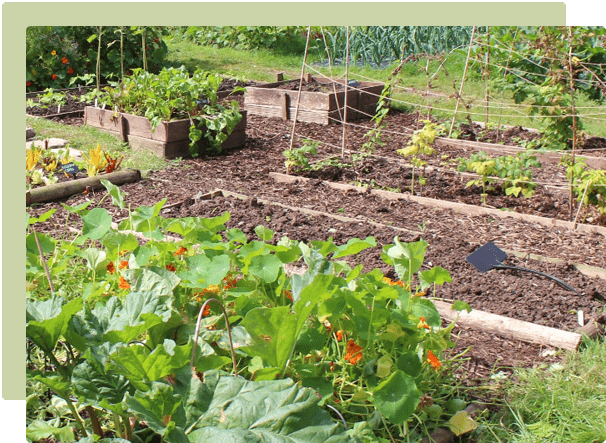
Spring is on the horizon and with it, warm weather and planting your spring /summer veggie garden. While some people are itching to get their tomatoes planted at the first sign of warmth – please wait! For most of NZ, it’s still a while yet before the soil and air temperatures rise enough and the threat of frosts has passed. August is prep time in the vegetable garden. Time to look back at the previous garden and remember what was planted where. It’s always good to look at what went well and what didn’t when you are planning what to grow for this year. Keep in mind that best practice is to not plant the same plant in the same place year after year; this helps to prevent pests and diseases building up. Crop rotation also ensures the plants don’t all need the same nutrients year after year and enables the soil nutrients to be used or replenished strategically. If you are an avid veggie gardener and grow year round, it doesn’t hurt to give the soil a little rest before planting the summer garden. Turn the soil over, mix in some compost and fertiliser and leave it to settle for a few weeks before planting begins. If you are a summer gardener and the garden has been left over winter, you may need to remove some weeds before doing the same thing as above. A word on fertiliser – consider what you are planting and what grew in that spot the previous year. Plants need a combination of nutrients and minerals but broadly speaking, leafy plants need nitrogen for green leafy growth, root crops need phosphate for root development and flowering plants need potassium for flower/fruit development so choose an appropriate fertiliser to apply. An organic based fertiliser such as sheep pellets has the benefit of improving your soil as well as feeding the plant so that is always a good base to start from. There is more on improving the soil later in this blog. You can apply a specific granular fertiliser such as tomato fertiliser to ensure the correct mix of nutrients are present during the growing season. Good soil is the key to good harvests. Any improvement you can make to your soil will pay back in healthier plants and increased yields. In any soil, whether it is heavy clay right through to light and sandy, the best thing you can do is add compost and do it at least once or twice a year, every year. Compost is organic matter, which helps free draining sandy soil retain more moisture and nutrients. It will also help break up the very small and tightly packed clay particles to improve the soil structure, drainage and access to nutrients in clay soils. Every time you harvest vegetables and are about to plant something new in that spot, dig some compost into the soil before planting. Spread a layer around as mulch to help conserve soil moisture if it’s in a garden that you don’t dig over. It will get incorporated into the soil by the earthworms, it just takes a little longer than digging it in. Compost has the ability - over time - to turn rubbish or average soil into excellent soil. Another way you can add organic matter to the soil is to plant a ‘green manure crop’ in spaces that will be empty for a while, the winter vegetable garden can be a prime example. Sow a crop of lupin, mustard or oats, let them grow for a minimum of 6 weeks or you can let them grow until they are about to flower. At this stage you cut them down - the finer the better- with hedge shears and then dig them into the soil. You need to give them time to break down into the soil before replanting so allow plenty of time if you’re going to do this. Don’t pull them out by the roots. The entire plant with the top (cut up finely) needs to be dug into the soil. The finer the top is chopped, the faster it will break down into the soil. There are other benefits to a green manure crop than just improving the soil. Lupins take nitrogen out of the air and fix it as nodules on the plant's roots, natural fertiliser at its best! Mustard is a natural soil cleanser, and an effective remedy if you find wireworms in your potatoes. As Alexander Graham Bell once said, “before anything else, preparation is the key to success”. So spend some time planning and preparing your veggie garden and the rewards will follow! By Kelly Jean Reyland of Garden Advice NZ (www.gardenadvice.co.nz)

Gardeners around the globe have harnessed the power of seaweed for thousands of years, using this rich source of nutrients to improve soil quality and promote healthy plant growth. Today, there are plenty of amazing, organic seaweed fertilisers available (in fact, you can find a few right here), but did you know that you can easily make your own seaweed tonic at home? Seaweed is packed full of minerals, trace elements, and growth-promoting hormones, making it an excellent organic fertiliser. If you live near the coast and have access to seaweed, get ready to roll up your sleeves and get gathering: Step 1: Harvest This can be a fun weekend activity (especially with the kids in tow), or get your gumboots on and brave a stormy, wintery day. Here in NZ we are lucky to have such an accessible coastline - most of us are never too far from the sea! You can collect various different types of seaweed, but the main variety you’ll find here is kelp. It's best to collect seaweed that has washed up on the shore and is no longer submerged in saltwater. Take a cart (like the one pictured), or a garden bag to collect your seaweed spoils. Step 2: Rinse After collecting your seaweed, rinse it thoroughly with fresh water to remove excess salt, sand, and any other debris. This step is essential! Step 3: Chop Cut or chop your seaweed into small-ish pieces using scissors or a knife. This will make it easier to handle, and also accelerates the decomposition process. Step 4: Soak Now to create your Seaweed Solution! Place the chopped seaweed in a large container or bucket, then add water to completely submerge it. Let the seaweed soak in water for about 8 weeks. Stir the mixture occasionally, and watch water turn brown as the nutrients from the seaweed leach into the solution. Step 5: Dilute The resulting liquid fertiliser will need to be diluted with water before using it on your plants. A common dilution ratio is 1 part seaweed fertiliser to 3-4 parts water. Step 6: Apply Once you’ve diluted your seaweed fertiliser, you can use it to water your plants or as a foliar spray. Both methods are beneficial for providing nutrients and improving plant health. Apply the fertiliser every 2-4 weeks during the growing season, and watch as your garden blooms! It’s really as easy as that; your resulting seaweed potion will be packed full of potassium, nitrogen, and other micronutrients, all of which promote healthy root growth and overall plant vigour. It’ll also enhance soil structure, water retention, and microbial activity in the soil. Make the most of this natural, readily available resource if you can - your garden will thank you! If you don't have 8 weeks up your sleeve, or perhaps you don't live near a beach with plentiful seaweed, you can find some excellent organic seaweed fertilisers & tonics in our Organic Garden range. An important note; always ensure to check local regulations before harvesting seaweed from natural environments, as some areas may have restrictions or guidelines for collecting seaweed.

August: the last "official" month of winter! Spring is on the horizon. While there's still a decent amount of cold & wet weather ahead, we can start thinking about the busy growth seasons coming up. Read on for what to plant in August, some general maintenance tasks, and a reminder on refreshing your soil before spring. WHAT TO PLANT THIS MONTH Plant strawberries if you haven’t done so already - get them in now so they get the benefits of the cold weather. For your established strawberry plants, remember to pinch out the first few flowers to let the plant become more established. This will set you up for a better harvest. Plant rhubarb, and lift and divide any established crops. Start sprouting your seed potatoes; get these in by September at the latest if you want to harvest by Christmas. The following seeds can be sown now: kale, culiflower, cabbage, celery, beetroot, lettuce, broccoli, silverbeet, peas, carrots and spinach. These seedlings can be planted: spinach, cabbage, broccoli, cauliflower, lettuce, leeks, and silverbeet. IN THE FLOWER GARDEN Plant summer flowering bulbs: dahlia (in frost protected areas), begonias, and gladioli. Add some bulb food to the soil as you plant them. Add a top dressing of bulb food to your spring flowering bulbs while you’re at it. New season roses are in store and can be planted! You can also plant hebes, violas, azaleas, lavender, rhododendrons, calendula. Hopefully you’ll be enjoying the first of your spring flowering bulbs; hyacinth, daffodils and tulips, depending on your location. OTHER TASKS TO DO IN AUGUST... Protect your winter crops from fungal and bacterial diseases with some FreeFlo Copper. Continue to spray approx. once every 2 weeks. Use Enspray Oil to control sooty mold, mites, aphids and white fly on fruit and citrus trees. The oil smoothers pests & their eggs to protect your plants. A low toxic option for controlling pests. Give your established blueberries & strawberries a head start with some fruits & berries food. Now is a good time to fertilise the lawn, ready for spring growth over the next few months. Dig in your established cover crops. They’ll break down into the top layer of soil within a few weeks, adding valuable nutrients back into the soil. Plan your crops for the upcoming season! Spring is on the horizon, so now’s the time to sit down (we recommend with a nice cup of tea) and plan out what you want to grow, and where to plant it. This Five Year Record Book from the RHS is great for planning & recording. REFRESHING YOUR SOIL FOR SPRING In order to get the most out of our gardens, whether that’s more flowers, bigger veggies, or increased resistance to pests and diseases - we need to feed and enrich our soil. The simplest and most effective way is to add organic matter. This can improve soil structure, nutrient content, and water-holding capacity, leading to more abundant growth. Prepare your garden for spring planting by digging in generous helpings of organic matter like compost, worm castings, sheep pellets, manure, leaf litter or lime. Dig your organic matter about 5cm into the top layer of soil to enrich it for the upcoming growth season.

You may have heard the term “no-dig gardening” being bandied about recently. Also known as “no-till” or “lasagne” gardening, this method is certainly becoming popular among garden enthusiasts and even farmers around the globe - and we can understand why. No-dig gardening is rooted in ecological principles and sustainable practices; but it also offers a host of practical benefits to the gardener, from less groundwork & maintenance, to healthier soil and reduced weed growth. If you’re curious about this method, and perhaps want to give it a go in your own garden, this guide is for you.What is it?As the name suggests, no-dig gardening involves growing plants without disturbing the existing soil structure. No digging or tilling required! Once you’ve set up your no-dig garden bed it can be left undisturbed (aside from planting new seeds & plants, and topping up the surface with mulch as it breaks down over time). Unlike traditional gardening methods that require turning the soil, no-dig gardening focuses on creating and nurturing healthy, biodiverse soil ecosystems through the layering of organic matter. This method mimics nature's way of composting, allowing the soil to develop naturally and sustainably.A few key benefits of no-dig gardening include…Enhanced Soil Health: Leaving your soil undisturbed allows beneficial soil organisms to thrive. Healthy soil structure creates the foundation for good microorganism and earthworm activity. The subsequent improved nutrient cycling and better water retention = more robust and productive plants.Reduced Weed Growth: By layering organic mulch or compost on top of the soil, no-dig gardening suppresses weed growth.Natural aeration & drainage: Microbes, earthworms & other beneficial bugs create tunnels in your soil, resulting in better aeration and drainage. Biodiversity: A more balanced ecosystem within your soil attracts beneficial insects and wildlife. This in turn helps control pests and diseases, reducing the need for chemical interventions.Slower nutrient release: As organic matter in your soil breaks down, essential nutrients are released to your plants. Digging into your soil increases the speed these nutrients are released. The no-dig method allows nutrients to be released naturally at a slower, steadier rate, which is better for plant growth.Sustainability: No-dig gardening reduces soil erosion, and increased water retention allows you to conserve water.All of this results in less manual intervention from you, and better plant growth, health & productivity.Get started with no-dig gardening Choose a sunny site (at least 6 hours of sunlight per day). Avoid areas prone to waterlogging or heavy shade. You can create your no-dig garden bed over grass, dirt, or even concrete. You can also use a raised bed or container. You’ll need to gather a range of organic materials: compost, straw, leaves, grass clippings, newspaper, twigs & branches, woodchips, aged manure, seaweed, coffee grounds, etc. You can use store-bought compost, but as always we recommend home-made compost if you have it, as it contains a broader range of nutrients. Clear any existing weeds or vegetation in your chosen area. If you’re creating your garden bed over lawn or dirt, use a thick layer of cardboard or several layers of newspaper to smother grass and weeds. Remember to wet it down with water before layering on your organic material in the next step. Spread a 10-15 cm layer of compost, well-rotted manure or wood chips over the cardboard / newspaper base. Top this with alternating layers of your organic matter - straw, leaves, grass clippings, more compost etc. (You can see why it’s also called the ‘lasagne’ method!). Water each layer as you build to encourage decomposition and settling. Top your no-dig garden bed with a generous layer of compost, and plant in your seeds / seedlings. Finish with some pea straw mulch around your plants. Over time, the layers in your garden bed will gradually break down and create a nutrient-rich growing medium. As this happens, you’ll notice the height will start to drop - keep it topped up with alternating layers of organic matter to keep the process going. Tips for maintaining Your no-dig garden Mulch, mulch, and more mulch! Mulching is going to replace digging. This is the key to successful no-dig gardening, and is how you enrich soil, suppress weeds and conserve moisture. Regularly add layers of mulch, including leaf litter, wood chips, straw, grass clippings and compost. Keep mulch pulled back from plant stems, especially seedlings. Rotate your crops each season to prevent nutrient depletion, and minimise the risk of disease and pests building up in the soil. Don’t overwater your garden. As your soil will retain more moisture, you won’t need to water as often - overwatering could cause the soil to compact down. Continue composting kitchen scraps and garden waste to maintain a steady supply of compost for your no-dig garden. Your organic waste is such a valuable resource - don’t throw it out, compost it yourself to make the most of all those nutrients! Images:Image1 by woodleywonderworks (licensed under CC BY 2.0.)Image 2 & 3 by Samuel Mann (licensed under CC BY 2.0.)Image 3 by hardworkinghippy : La Ferme de Sourrou (licensed under CC BY-SA 2.0.)

Companion planting is an age-old practice that can help you to create a flourishing, resilient garden ecosystem. If you're looking to optimise space and enjoy benefits such as enhanced nutrient uptake, better pollination, and natural pest control, companion planting is absolutely a technique worth exploring.The main idea behind companion planting is to foster mutually beneficial relationships between plants, by strategically planting different species in close proximity to one another. By mimicking natural ecosystems, we can create a diverse and balanced environment that supports the overall well-being of your garden. We’ve listed some key benefits below, along with 10 easy companion planting pairs you can try to get you started!What are the benefits?Pest Management: One of the key advantages of companion planting is natural pest control. Certain plants emit chemical compounds that repel pests, while others attract beneficial insects that prey on garden pests. By interplanting compatible species, you can minimise the need for harmful pesticides and maintain a healthier garden ecosystem.Improved Pollination: Some plants rely on pollinators, such as bees and butterflies, to produce fruits or seeds. By growing flowers and plants that attract pollinators near your vegetable or fruit-bearing plants, you increase the chances of successful pollination and subsequently enhance crop yields.Nutrient Enhancement: Companion plants can work together to improve nutrient absorption and soil health. For instance, legumes, such as beans and peas, have the ability to fix nitrogen in the soil, benefiting neighboring plants that require nitrogen for growth. Additionally, certain plants act as "dynamic accumulators," drawing up nutrients from deeper soil layers and making them available to shallow-rooted plants nearby.Weed Suppression: Intercropping compatible plant species can help suppress weed growth by providing shade, reducing soil erosion, and competing for resources like sunlight, water, and nutrients. Maximising Space: Companion planting allows you to make the most of limited garden space. Optimise your garden's productivity by selecting plant combinations that grow well together.Here are some easy companion planting combinations to try in your garden...Tomato and Basil: Tomatoes and basil make a classic companion planting pair. Basil acts as a natural insect repellent, protecting tomatoes from pests like aphids and whiteflies. Plus the aromatic foliage of basil can enhance the flavor of tomatoes when used in the kitchen!Carrots and Onions: Planting carrots and onions together is a win-win situation. Onions help repel carrot rust flies, while carrots deter onion flies. This interplanting is also a great way to utilise space efficiently in your garden.Cucumber and Radish: Cucumbers are known for their sprawling nature, while radishes are quick-growing and occupy less space. Planting radishes alongside cucumbers not only helps deter common cucumber pests, but also serves as an indicator for cucumber diseases. If the radishes show signs of infection, you can take preventive measures to protect your cucumbers.Roses and Parsley: This unexpected combination comes with loads of benefits (and surprisingly, they can look quite good together too!). Parsley deters pests such as aphids and beetles. And as an added bonus, some say parsley can even enhance the fragrance of your roses.Beans and Corn: The combination of beans and corn is a classic example of the "Three Sisters" planting technique used by Native Americans (with the third "sister" crop being pumpkin or squash). Beans climb the sturdy corn stalks for support, while the beans' nitrogen-fixing abilities bring benefits to the corn.Squash and Nasturtium: Nasturtiums are excellent companions for squash plants. They act as a natural pest repellent, deterring squash bugs and other harmful insects. The bright flowers of nasturtiums also attract pollinators, benefiting both plants.Lettuce and Chives: Planting chives alongside lettuce not only adds flavor to your salads but also helps deter pests. Chives repel aphids, carrot flies, and other common lettuce pests. Additionally, the upright growth of chives provides some shade for the lettuce, preventing it from going to seed in hot weather.Spinach and Strawberries: Pairing spinach with strawberries is a great way to maximise space and soil fertility. The sprawling nature of strawberry plants acts as a living mulch, shading the soil and suppressing weed growth around the spinach. In return, the spinach's dense foliage protects the strawberries' shallow roots and helps retain soil moisture.Cabbage and Dill: Planting dill near cabbage family plants, such as broccoli, cabbage, or kale, can attract beneficial insects like ladybugs and lacewings. These insects prey on pests like aphids and cabbage worms, reducing the need for chemical interventions. Just be sure to keep dill away from carrots, as they may negatively affect each other's growth.Eggplant and Calendula: Calendula is a great companion for eggplants. The vibrant flowers of calendula attract pollinators while also repelling aphids and nematodes. These pests are common problems for eggplants, making calendula a valuable ally in promoting healthy eggplant growth.Companion planting is a simple, practical technique that you can delve into endlessly. By understanding the benefits of companion planting and experimenting with plant combinations, you can enhance pest management, improve pollination, optimise space, and boost overall plant health. Whether you're a seasoned green-thumb or just starting out, companion planting offers a sustainable and natural way to nurture your plants and optimise your harvest. We’d definitely recommend giving it a go!

