

News
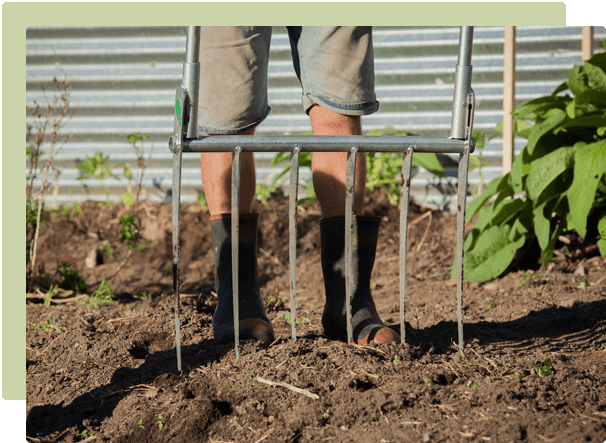

Autumn means it’s time to get those spring-flowering bulbs in the ground! We’re already anticipating those beautiful spring & summer blooms. If you’re new to bulb growing, or still wondering what to plant this year, read on for some bulb planting tips & inspiration.Which bulbs should I choose?There are plenty of spring flowering bulbs to choose from; here are some popular varieties grown here in NZ:Crocus [early bloom]This hardy flower does well in colder regions, but can be grown successfully all across the country. Crocus are early bloomers, providing some welcome colour from late winter to early spring. Plant them somewhere with full sun if possible (although they will also tolerate partial shade), and ensure they are in an area with well-draining soil. These bulbs multiply quickly, meaning you’ll have more and more each year.Ranunculus [mid bloom]Technically a corm (not a bulb), this colourful flower can be planted from as early as mid-January, all the way until mid-May. Planting early will result in flowers from mid to late winter, while planting later will produce flowers from mid spring. Plant them in either full sun or partial shade, and ensure soil is well-draining. Ranunculus will also grow well in pots or containers.Tulip [early bloom]Possibly one of the most well-known & loved spring bulbs, these bright, colourful flowers are a welcome sight when they bloom in spring. They are quite a hardy plant and can be grown across NZ; however, if you live in a warmer region you’ll need to “chill” your tulip bulbs in the fridge for 6-8 weeks before planting. Place them in the fridge around late March, ready for planting in late May. They can be grown in either full sun or partial shade, and like good well-draining soil.Bluebell (Scilla) [late bloom]The two most common bluebell varieties are English Bluebells and Spanish Bluebells. Here in NZ, our climate is more suited to Spanish Bluebells - hence this is the most common variety you’ll see around. These are one of the easiest bulbs to grow, and will multiply quite quickly once you get them started. Plant in autumn to enjoy flowers throughout spring & summer. Bluebells like partial shade, making them great flowers to position beneath trees. Daffodil [early - mid bloom]This iconic yellow flower provides some welcome spring cheer! You can’t go too wrong with daffodils; plant these easy bulbs between mid-March and late May to enjoy flowers throughout spring. Daffodils like full to partial sun, and need good well-draining soil. They’ll also grow happily in containers or pots. There are so many varieties to choose from these days when it comes to both colour and bloom time, making them a great choice when considering succession planting!Hyacinth [mid bloom]This lovely bloom is known for its sweet, fragrant scent. This is a bulb that needs a decent period of cold to bloom properly - if you live in an area with warmer winters, you will need to chill hyacinth bulbs in the fridge for about 6 weeks prior to planting. Plant your hyacinth bulbs from early March right through to the end of May for spring blooms. Choose a well-draining spot in full sun. Remember to wear gloves when handling hyacinth bulbs! They are toxic and could cause irritation to the skin.Chilling your bulbsMost spring-flowering bulbs need consistent cool temperatures (below 10°C during the day) in order to produce a flower bud. This period of dormancy over winter is essential for them to complete their development. Come spring-time, rising temperatures signal to the plant that it’s time to bloom! This means in areas with warmer winters (most of the North Island here in NZ), certain bulbs will need a bit of help; particularly bulbs that are native to cooler regions such as hyacinths and tulips. You can do this by popping them in the fridge for a period of time before planting - what gardeners call “pre-chilling” their bulbs.The length of time you need to chill each type of bulb will vary, but usually around 8 weeks is sufficient. If you live in an area that doesn’t see many frosts, you should pre-chill your Daffodil, Tulip, Crocus and Hyacinth bulbs.If your bulbs don’t have a sufficient chilling period (whether that be naturally in the ground over winter, or in the fridge before planting), you’re likely to see plants with stunted growth and small flowers.Some pre-chilling tips to keep in mind… Keep your bulbs in the crisper drawer inside a paper bag (NOT plastic - the bulbs will sweat, causing rot). Do not place them near the back of the fridge as it may be too cold. Keep them well away from fruit, particularly apples and pears. These fruits emit a gas called ethylene as they ripen which can damage your bulbs. Planting your bulbsIdeal planting depth depends on the type of bulb. The packaging your bulbs come in should provide specific details. However, you can use this general rule of thumb: plant the bulb 2-3 times the height of the bulb. For example, if your bulb is 2cm tall you should plant it about 4-6cm deep. And if in doubt, too deep is generally better than too shallow!It’s also important to plant your bulbs the right way up - with the pointed end facing upwards towards the sky. You’ll be able to identify the pointed end easily with ‘true’ bulbs such as daffodils and tulips, however it can be a bit harder with bulbs such as ranunculus or anemone. Plant these bulbs on their sides - they’ll grow towards the light and straighten out themselves. Prepare your soil for planting by loosening it up and mixing in some bulb food (such as the Tui Bulb Food) and compost. Spring-flowering bulbs like well-draining, loamy soils. When planting, you can use a bulb planter to save time and avoid bending - a game changer when you’re planting out lots! We recommend the Sneeboer Stainless Bulb Planter or Sneeboer Great Dixter Bulb Planter. Feed with bulb food again when stems start appearing, and then again when flowering starts. Succession & Stagger PlantingTo enjoy continuous flowering throughout spring and summer, make sure you’re planting an assortment of bulbs: you want your garden to be made up of early blooms, mid blooms and late blooms. Succession planting is essentially choosing bulbs that bloom at different times. The packaging of your bulbs should give you the relevant details for the specific variety you have. Don’t forget to take bloom time & height into consideration when planning your garden, too! You can get really creative - with some pre-planning, you’ll enjoy a colourful garden all season long.Stagger planting is another way to enjoy your flowers for longer. Simply plant your bulbs (of the same variety) in groupings two weeks apart, for a period of 6-8 weeks. This way your bulbs should bloom at staggered times throughout the season.

Coal fires, a 1920 hammer and a royal warrant. Meet the Dutch family who have been forging heirloom garden tools since 1913.

Watching wild birds enjoy your garden brings a special kind of happiness. It's especially exciting to spot our stunning New Zealand natives thriving, such as Tui, Kereru, Fantail (Pīwakawaka) or Bellbird (Korimako). We think waking up to their vibrant chorus outside your window is an unbeatable way to start the day! One surefire way to coax more birds into your yard is to hang a bird feeder. It's especially important to keep your feeders topped up throughout the colder months, as this is when naturally available food sources can become scarce. They will definitely appreciate the extra sustenance, and you'll get to enjoy their company as an added bonus. Plus, birds visiting your garden will gobble up insects or bugs, making them a fantastic, natural form of pest control. A true win-win! Which feeder you choose depends on which birds you are wanting to attract to your garden. Different birds have different dietary needs, ranging from seed, nectar, insects & fruit. We have plenty of styles to choose from, along with a variety of seed, energy food, and nectar options to go with your feeder. Read on to find out which feeder & feed to choose. Wild Bird Seed & Seed FeedersA good bird seed mix is high in energy and rich in essential nutrients, great for keeping your local birds happy and healthy. Use seed to attract common garden birds such as chaffinch, silvereye, dove, goldfinch, greenfinch, pigeon, rosella, pheasant, sparrow, thrush or yellowhammer. Our premium Coarse and Fine bird seed mixes from Topflite provide a ton of health benefits, and are grown right here in NZ! Both are available in 1kg, 2kg, 5kg & 20kg bags. The Coarse seed is ideal for larger seed-eating birds, or for use in windier areas as it's less likely to blow away. We also have a great Wild Bird Seed Mix from Tui, available in 1kg and 5kg sizes. Pair any of our wild bird seed mixes with the following popular feeders (plus more in our Wild Bird Feeders range)… Topflite Splash and Feed Platform - This handy hanging ceramic dish can be used for seed as well as fruit, or even as a bird bath! Mason Jar Wild Bird Feeder - Super stylish, this glass feeder features 8 feeding ports, and there's even a matching Mason Jar Bird Waterer available separately. Premium Flip Top Wild Bird Seed Feeder - Super convenient, this feeder has a flip-top lid for easy filling, four feeding perches and a quick release base for simple cleaning. Topflite Bird Bach - this cute little house-shaped feeder can also be used for fruit & energy food, as well as seed. Topflite Lantern Feeder - a sweet & stylish seed feeder, built to last from earth-friendly bamboo. Tui Antique Wild Bird Feeder - This attractive antique-look feeder features 3 seed feeding portals on the screen and 3 openings on the seed tray base. Seed bells Seed bells are another great and easy option for attracting birds such as chaffinch, goldfinch, greenfinch, pigeons, rosella, sparrow, and yellowhammer. Simply hang up and watch the birds flock in! These are great for encouraging that instinctive pecking action, providing both entertainment & nutrition aplenty. Our seed bell options include... Tui Wild Bird Seed Bell Topflite Large Wild Bird Seed Cone Topflite Wild Bird Seed Bell High Energy FoodOur range of Topflite Energy Cakes, Truffles & Logs provide an immediate source of energy & protein, making them especially ideal during breeding season or throughout the winter months. Birds absolutely love these yummy vegetable oil treats; they come in flavours such as Blueberry, Peanut, Mealworm and Berry. Use them to attract birds such as silvereye, sparrow, thrush, waxeye, blackbird and yellowhammer. Our Energy Food options include… Wild Bird Energy Truffles - These can be served up in a Topflite Energy Truffle Feeder or a Topflite Truffle Twister Feeder. You can also put these out on your bird feeding platform, or even pierce them onto a stick or branch. Wild Bird Energy Logs - Suitable for the Topflite Wild Bird Energy Log Feeder. Tip: Silvereye are particularly fond of the peanut flavoured Energy Logs! Energy Cakes - Place these inside a Topflite Wild Bird Cake Feeder (or you can simply place them out on your dedicated bird table/feeding area!) Energy Jumbo Log - A bigger version of the Wild Bird Energy Logs, pop one of these into your Topflite Energy Truffle Feeder or The Little Bird Feeder. A little goes a long way! Topflite Wild Bird Energy Coconut feeder - a feeder & feed all in one! These coconut shells have been filled with nutritious peanut flavoured energy food. Plus once the energy food is finished, you can fill it up with seed or fruit. Nectar If you're wanting to attract NZ native birds into your garden, a nectar feeder & nectar mix is a good bet. Tui, Bellbird and Silvereye in particular are nectar feeding natives that will happily visit a feeder. Our premium quality Topflite Nectar Mix creates a honey & glucose based nectar, and has the added benefit of essential vitamins and minerals. Simply mix one part nectar powder to four parts water, and pop the mixture into one of our nectar feeders... Topflite Nectar Feeder Tui Nectar Feeder Fruit Feeders Many of our NZ native birds also love filling themselves up with fruit, including silvereye, tui and bellbird. Freshly cut up oranges, apples, pears, or bananas on a feeder or platform can attract these stunning native birds! Try using cut up fruit with one of these stylish fruit feeders… Sophie Conran - Apple Bird Feeder Heart Sophie Conran - Apple Bird Feeder House Metalbird Bird Feede Metalbird Hanging Bird Feeder A few important bird feeding tips… It's a good idea to keep your feeders topped up year round (not just in winter) so your local birds know where to find it when they need it. Try to top your feeders up in the morning, as birds do most of their feeding early in the day. Hang your feeders up high, so your visiting birds are not vulnerable to predators while they feed. Don't have many trees around? Take a look at our Wild Bird Feeding Station. Make sure your water station or bird bath is topped up with fresh water throughout summer. Clean out your bird feeders regularly (every few weeks) to prevent any harmful mold building up. Do not use honey and water mixed together! Although birds love it, unfortunately so do bees. This can lead to disease among these precious pollinators. Keep your bird seed dry. Check out our Bird Seed Storage Tin. Finally, remember to be patient! It may take some time for birds to find (and become comfortable) using your feeder. With repetition and a bit of time, they'll soon be visiting your garden on the regular. Happy bird watching!

Wonderful worms! These squiggly, squirmy earth-dwellers can make some people squeamish. But they are the ultimate waste disposal experts, breaking down our refuse and transforming it into nutrient-rich castings that replenish and revitalise our soil. Starting a worm farm is a great method for diverting your organic household waste from landfill; read on to find out why & how to to start your own worm farm. Vermicomposting with Tiger Worms‘Vermicomposting’ is the use of worms for converting organic matter into a nutrient dense product known as vermicompost. In other words, worm farming! Here in New Zealand, we use Tiger Worms (Eisenia foetida). These worms have alternating red and yellow stripes along their bodies, hence the “tiger” name. These guzzlers can consume their body weight in food each day, making them perfect for worm farms and compost heaps. They live and feed close to the surface of the soil, and tend to stay in one area. How does it happen? The worms eat soft, moist organic materials (they like decaying food scraps, compost, manure, and even sewage), and pass them out as ‘vermicast’ (often referred to as worm castings), and liquid ‘worm tea’. Worm castings and tea are packed with valuable minerals and nutrients, conditioning the surrounding soil and making a near-perfect organic fertiliser that plants can easily absorb. Worm farming at homeCreating your own worm farm is a fantastic, efficient way to compost your kitchen scraps, diverting them from landfill & creating the perfect plant food for your garden. Once established, worm farms are relatively low maintenance - put your scraps in, and wait for the worms to do the work! Starting your worm farmThere are a number of different worm farm designs available - Hungybin, Subpod, and various tiered worm farm systems are popular options. Choose a sheltered, shady spot for your worm farm and start off with a bedding of shredded cardboard, compost, or coconut fibre for them to live in. You’ll want at least 250g Tiger Worms to get you going (that’s about 1000 worms). Use a worm blanket to keep them covered - place this over top of the food (beneath the lid). Worms are sensitive to light, so this allows them to come up to the surface to feed. You can also use a simple piece of cardboard as a worm blanket (but beware they may begin to eat this!). You also need to make sure your worms are kept nice and moist by sprinkling water over the worm blanket every so often. Make sure they’re not too wet though - your worm farm should not appear soggy. If it becomes too sodden, mix in some dried leaves or paper to keep things aerated & to improve drainage. Feeding your wormsHow much food you place in your worm farm will depend on how many worms you’re starting off with - start by feeding in moderation, and you’ll be able to adjust as you go. You can expect 1kg of worms to eat about 5 kg of food per week. Your worms will continue to breed, meaning the worm farm will be able to consume more over time. It can take a couple of months for your worm farm to reach full capacity; as a guide your Tiger Worm population will double their weight in about 4 months if conditions are ideal. Fun fact: worms will actually limit their breeding to the space & food available - how clever is that! A good place to start is providing your worms with a 3cm (approx.) layer of food every one to two days. If you notice the food isn’t being eaten, you may have overfed them - don’t keep adding more! Stop for a few days until they catch up, as your worms won’t like lots of rotting food sitting on top of them. Also remember to cut your scraps up into smaller pieces - this helps the worms digest faster and speeds up the process. Your worms will gobble up foods like egg shells, fresh fruits and vegetables, shredded paper or brown cardboard, coffee grounds, or tea bags. Try to give them a variety of foods, rather than just one type. Things to avoid feeding your worms… Spicy foods Meat Dairy Pasta or bread Oils and fats Onion or garlic Citrus or other acidic foods Cooked foods Shiny/glossy paper or cardboard …And you’re away!Now that you’re all set up, you can sit back and let the worms do the heavy lifting. The method of harvesting your worm castings and worm tea will vary, depending on the type of worm farm you have chosen. Once harvested, just remember to dilute your worm tea with water before using it as a liquid fertiliser, as it will be very concentrated. You can use your castings as a top dressing, a side dressing, or worked in to the soil. Worm castings improve soil aeration, drainage, and water retention. They contain all the essential nutrients that plants need and can be used on any type of plant without the risk of nutrient burn! These wriggly little creatures are real powerhouses that have so many benefits to offer. With a little effort, you’ll be reducing your waste, recycling nutrients back into the soil, and enhancing soil quality for a thriving garden - so many wins. Happy worm farming bugg® Gardeners! P.s. Worm farming not for you, but still want the benefits for your garden? You can buy natural worm castings here.

International composting week has us thinking about all things composting: compost bins, worm farms, bokashi… whatever method you choose, diverting your organic waste from landfill is fantastic, and comes with many benefits for both you and the planet.Unfortunately, an eye-watering 50% of the waste that goes to landfill here in Auckland is organic, meaning it could be composted and recycled back into the soil. All those valuable nutrients from your kitchen scraps are lost once trapped in landfill. And if that isn't bad enough, this waste releases Methane as it anaerobically rots, a leading contributor to climate change. The scale of the problem can certainly seem overwhelming, but in fact there are many effective ways we can contribute to the solution on an individual level, and yep, you guessed it: composting is a big one.However, we know there can be barriers to composting. You may not have the space, or simply don't have access to a garden to bury your compost or bokashi product. There are many factors that might make composting difficult for your particular lifestyle. Luckily, there are clever options that work even in the smallest spaces.Bokashi for apartment compostingA bokashi bin is the small-space gardener's secret weapon. Bokashi ferments your kitchen scraps (including meat, dairy and citrus, which traditional compost can't handle) inside a sealed bucket. No smell, no flies, and it lives happily under your sink or on a balcony. Once full, you can bury the fermented contents in any garden, donate to a community compost, or feed it to a worm farm to finish the process.Worm farms for small spacesA worm farm tucked on a balcony or in a laundry quietly turns your scraps into worm castings, one of the most nutrient-dense soil amendments going. Compact worm farms like the Hungry Bin or Subpod Mini are designed exactly for the gardener short on horizontal real estate.Shop the rangeSHOP COMPOST BINSSHOP WORM FARMSSHOP BOKASHI BINS

Poppies are a stunning feature in winter & spring gardens, with the classic red ‘Anzac’ poppy (Flanders poppy) serving as an emblem of remembrance to those who served in WWI & following wars.But how did the poppy become such a symbol? During the spring of 1915 in Northern France, masses of scarlet poppies began popping up across desolate battlefields - often they were the only plants to grow in the broken up soil. Canadian surgeon John McCrae penned the poem In Flanders Fields, inspired by these poppy fields and creating a lasting symbolic memorial to those who had fallen.Following this, handmade silk poppies were sold to raise money for war veterans, and in 1921 Allied countries recognised the first Poppy Day on Armistice Day; November 11th, 1921. New Zealand also placed an order for these silk poppies with the intention of wearing them for Armistice Day, however when the shipment was delayed our Poppy Day was recognised on the 24th of April instead - and it's been that way ever since.Quite fittingly, sowing poppies on Anzac Day here in NZ means they will flower around Armistice Day in November.Sowing your seedsIn mild climates, these beloved blooms are ideally sown in autumn. You’ll want to select a sheltered, sunny spot in the garden with well-draining soil. Anzac/Flanders poppies don’t tolerate being transplanted, so you’ll want to sow them directly into the garden bed. For an even spread of blooms, you can mix your poppy seed with a handful of sand before sowing. This also ensures they aren’t planted too thickly. Sprinkle the mix over your seed bed and cover with a very light layer of soil (or seed raising mix if you have it), ensuring they are still exposed to some sunlight. Keep the soil moist for about 2 weeks or until germination.

Considering an Aerobin, or maybe you’ve just invested? Great choice. The Aerobin is a fantastic way to divert your organic waste from landfill, and gives you rich, high-quality compost in return. Considering about 50% of the waste we create is organic, this is an effective, practical way to reduce greenhouse gas emissions - plus you’ll gain some amazing benefits in the process. Your garden will thank you! The Aerobin really is a breakthrough in the home composting game. Its central ‘aeration lung’ breaks down organic waste through aerobic composting, and eliminates the need for manual intervention. No need to turn the compost heap anymore! It also features thermally insulated walls, allowing you to compost year-round. These walls retain heat generated by the composting process, and prevent cold air getting inside. The hot temperatures achieved in the Aerobin even allow you to compost pathogens and weeds, thanks to microbic bacteria. To ensure your Aerobin is functioning at its best, there are a few things to keep in mind. Keeping the microbes in your compost happy requires a good supply of air, water, and a balanced diet (much like we do!). Read on for some tips for successful composting… First and foremost, the organic matter you put in your compost needs to be balanced. This results in more microbial activity, and therefore more efficient composting. The two key ingredients for healthy compost are both carbon-rich materials and nitrogen-rich materials. Carbon ingredients are commonly referred to as ‘brown’, as they include materials such as dried leaves, straw or cardboard. Nitrogen ingredients are often called ‘green’ as they include organic matter like fresh leaves, grass clippings and kitchen scraps. Note: although manure is brown in colour, it is actually a nitrogen-rich (green) material.As a rule-of-thumb, your compost should be formed by mostly carbon-rich material. A fairly easy way to manage this is for each part of nitrogen-rich material you add, make sure you add about 4 times that volume of carbon-rich material (if you’re going by weight instead of volume, the general ratio is 30:1). If you’re just beginning some trial and error may be required, but you’ll be able to tell fairly easily if it needs adjusting - too much nitrogen and the biomass will be smelly and slimy; too much carbon and the biomass will be dry, have no smell, and take a long time to decompose. If the compost process is working well, it will have a fresh, earthy scent. Along with balancing your organic materials, you also need to regulate moisture content. Microbes require a moist environment - not too dry, and not too wet. When loaded into your Aerobin, the biomass should feel like a moist sponge. Breaking down your organic matter speeds up the composting process. Crush, break up or cut bulky items for efficient composting. Scrunch up or shred paper (don’t lay in sheets), and mulch green waste materials if possible. You can do this by running a lawn mower over it a few times. Mix up your organic waste, and layer it into the bin - 10-15cm layers work well, although this does depend on the composition of your specific ‘ingredients’. Keep in mind, the Aerobin is most efficient when it is loaded to at least 50% capacity. Your Aerobin also features a ‘leachate tank’ to collect the liquid nutrients dispelled as part of the composting process. You can use this liquid (also known as ‘worm wee’) as a natural fertiliser for the garden. Empty this tank as required, and dilute it 20:1 with water before using it on your plants. Getting started When starting out with your Aerobin, the first thing we recommend you do is load a 10cm layer of dried leaves or twigs into the bottom. This will prevent any blockages. Next, lay in some moist, active compost (this can be purchased from a garden centre to get you started) - this ensures you have a healthy amount of microbes, providing a good base for the composting process to begin. Lastly, start adding your ingredients and you’re away! You can also visit the Aerobin Compost Simulator on the official Aerobin website. This feature allows you to simulate your compost using the specific ingredients/materials you have on hand, to ensure you achieve the ideal mix of carbon and nitrogen rich matter. You can purchase a 200L or 400L Aerobin here. Happy composting!

Many of us think of autumn as a time when things start to wind down in the garden. But there are actually a wide range of veggies and flowers you can start sowing now, for both winter and spring yields! Sowing seeds in autumn can provide you with fresh winter vegetables, and can also make for an earlier crop & some beautiful blooms come spring-time. Enjoy our ten picks for planting this autumn… VEGGIES: Carrots Carrots are a nice easy crop to grow, and can be planted in autumn here in NZ. They’ll do well in a sunny spot with well draining soil. Plant them 2cm deep and at least 10cm apart - just make sure they’re sown directly into the garden, as carrot seedlings don’t like being transplanted! They’ll be ready for harvest in about 6 weeks. Broccoli You can plant broccoli right throughout autumn in NZ. If sewing your seeds directly into the garden, make sure you plan ahead and plant them at least 10 weeks before the first autumn frost. Otherwise, grow them in a seed tray and transplant after about 5 weeks. Pick a sheltered but sunny spot, and make sure you plant them at least 30-50cm apart (as they like their space!). The central head will be ready for harvest after roughly 18 weeks - keep an eye on them and harvest before the yellow flowers open up. You can take a second picking a few weeks after the first harvest. Beetroot Beetroot is a great cold-weather crop, as it doesn’t require much space. If you’re growing from seed, soak them in warm water for a few hours before planting - this softens the seed coating and speeds up the germination process. Plant your seeds or seedlings at least 5cm apart, and after about 4 weeks thin them out by removing the smaller seedlings. Water daily for the first 2 weeks following planting, then water as needed. The leaves are ready to be harvested after 7-8 weeks (just make sure to leave a few behind so the root can continue to grow!), and the root is ready to harvest once the outer leaves are about 15cm long. Garlic While garlic is traditionally planted on the winter solstice, it can be sown from late autumn - think May onwards. Choose a sunny, well-draining area of the garden, and start with NZ grown garlic as your seed. Split the bulb into individual cloves and keep the largest few for planting; plant each clove 5cm deep (with the pointed end facing up) making sure they’re at least 20cm apart. You should see shoots within a month, and look forward to harvesting in summer. Lettuce Lettuce is a garden staple that can be enjoyed year-round. If planting in autumn, consider a loose-leaf variety - these are less likely to rot in cold/wet weather than hearting lettuces. They’re also great as you can grow them in planters on the patio or balcony, or straight into the garden! Choose a sunny spot, and sow the seeds just 3mm into the soil (i.e. very shallow!). Water regularly, and when ready to harvest simply pick off outer leaves as needed. Peas This cool-weather crop can be planted from late autumn through to late spring. Peas like full sun, in a spot that is sheltered from the wind. You’ll need a growing structure such as a teepee, trellis or stake (you can even use a branch!) to keep them off the ground as they grow - tall varieties will need more support than dwarf varieties. Sow your peas, spacing them at least 5cm apart. Make successive sowings to draw out the growing season, and harvest frequently after 1 ½ to 2 months. FLOWERS: There are plenty of cool-season flowers that can be sown during autumn. Some will flower during winter, and others will be ready to flower by spring. Sweet Alyssum These annuals are easy to grow, and provide a sweet carpet of colour in the garden. They are especially suited to coastal areas as they thrive in more alkaline soils. If you live in a frost-free part of the country, you can sow this cool-season flower in autumn and see flowers in as little as 2 months! (If you live in a colder area, wait until spring for this one). To start sweet alyssum from seed, scatter the seeds on top of your soil and lightly press them down, ensuring they are still exposed to light. Or, pick some up from your local nursery and directly transplant it into your garden. This annual is a notorious self-seeder, so once established it will come back year after year. Poppies These iconic blooms are a winter garden staple; sow them in autumn for winter & spring blooms. Most varieties can be sown directly into the garden, or sown in trays for transplanting (Flanders Poppies dislike being transplanted so sow this variety directly). They’ll do well in a sunny spot with free-draining soil. Tip: for a more even spread of flowers, mix your seed with sand before sowing. Cover the seeds with a very light layer of soil, and keep the bed moist for about 2 weeks or until germination. Nigella (Love-in-a-Mist) Nigella is a hardy annual plant, which will provide beautiful early spring blooms if planted in Autumn. They’ll do well in a sunny patch of the garden with well-draining soil. Nigella has a relatively short blooming period (about a month), so plant seeds successively every 3 weeks in Autumn to enjoy continuous blooms. Sweet Peas These beloved blooms are stunning with a beautiful fragrance, and come in many different varieties. Some find that sweet peas sown in autumn actually produce a stronger plant & more flowers than those sown in spring! Sow your seeds directly into the garden between March and early June. Choose a sunny, sheltered spot, making sure there is something in place to support it as it grows (a trellis, wall, line, or even a tree will work). Most varieties climb up to 2 metres. If your soil is rich, your sweet peas can flower for up to 3 or 4 months come spring-time! MORE AUTUMN GROWING TIPS… Before planting, replenish your soil by adding a new layer of compost. Give your established plants a boost using a nutrient-rich plant tonic, like seaweed, or seaweed and fish. Invest in garden covers & cloches to protect certain plants from the colder weather, and your brassicas from pesky bugs like whitefly. If sowing seeds directly into the garden, cover with a seed raising mix to protect your seedlings adding some worm castings will encourage growth. SHOP SEEDS SHOP COVERS & CLOCHES SHOP WORM CASTINGS SHOP PEST CONTROL

When you think of the word ‘irrigation’, we wouldn’t blame you if farming or agriculture comes to mind. But you’ll soon find that the average home garden can benefit from a well-thought-out irrigation system too! Irrigation can be implemented in any garden, and brings with it a multitude of benefits that can take your garden to the next level. Read on to find out what you’ve got to gain from installing irrigation in your own garden.Watering by hand is the traditional method of irrigation, and, naturally, is what most backyard gardeners rely on. You might be using a watering can or a hose to do this, and there is certainly nothing wrong with these methods! However, setting up an irrigation system can save you a great deal of time, effort, and money. Plus it can actually make for healthier, stronger plants. Let’s take a look at some of the benefits…. Conserve water: When watering by hand, you end up using far more water than is required. Much of that water will end up evaporating, or as runoff. A well-installed irrigation system can tailor the amount of water going to each area of your garden, resulting in much less waste. Good for your water bill, and good for the environment! Happier plants: Plants grow faster when they are watered with smaller amounts, over a sustained period of time (“drip feeding”). You also cut out the risk of over or under watering, meaning they’ll be healthier & stronger! Vege gardens will have higher yields, lawns will be luscious and less patchy, and so on. Happier soil: Too much water can cause valuable nutrients to be washed out from your soil. Applying a controlled amount of water makes for a healthier soil nutrient balance - and happier soil equals happier plants! Reduce pests & diseases: Irrigation allows you to direct exactly where your water is going. This is an excellent way to reduce unwanted pests, weeds, and diseases in your garden. When water is delivered directly to the roots of your plants, weeds miss out and therefore have less chance to germinate and take hold. Irrigation systems that direct water to the root also mean water isn’t left sitting on the plant itself, reducing the chance of various leaf diseases. Sheer convenience: An obvious benefit is all the time saved. Less time watering means more time planting, planning, harvesting, and simply enjoying your garden. Also, if you’re an avid gardener, being away from your garden probably causes a bit of anxiety. After all, how can you rest assured that your plants are getting the best care while you’re away? An irrigation system solves this! You can go on holiday knowing your garden is in good hands. There are various different types of irrigation systems to choose from, all ranging in cost, automation, and design. It’s up to you to decide how simple or complex you go! Some systems will require more planning and effort to set up, while others are more simple - but either way you’ll soon be reaping the benefits. Commonly used irrigation methods for home gardens include sprinklers and drip irrigation. Our range features a selection of drip irrigation systems, all which allow you to automatically water your plants without electricity, batteries, timers or mains water pressure! There are irrigation solutions for larger flower or veggie gardens, balcony gardens, even indoor pot plants. View the range here.Without a doubt, irrigating your garden can make a big difference - to your water use, to your time, and to your plants. And as we head into summer & the holiday season, now is the perfect time to get irrigating!Shop the collectionWatering Cans & Garden Irrigation

